I have been browsing different forums on discussions about micro-controllers with wireless capabilities, and one thing I noticed people keep talking about is the low cost, low power ESP8266. I didn’t pay much attention to it as it does not come with a cloud service like the Particle.io with their Core and Photon devices, nor was it easy to flash firmware, and C plus AT commands looks odd and unnatural to me. However, it’s low power consumption and the ability to run Lua do interest me enough to at least read a few articles about it, still, I have no intention to replace any of my existing Particle-Core I have built so far, until I see this, the NodeMCU dev board.
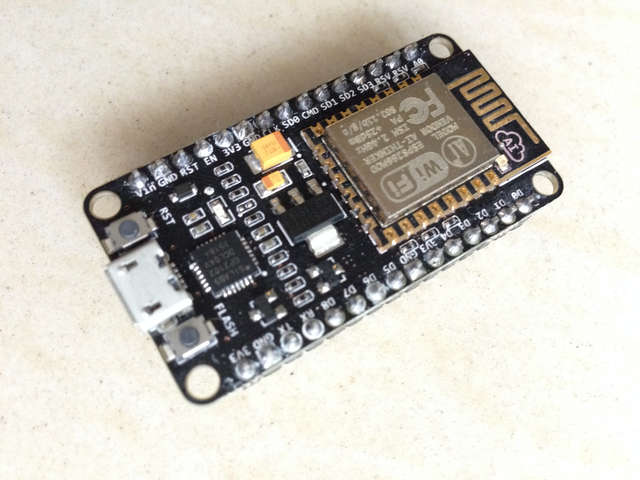
It is not a small board, mind you, as compared to the Particle-Photon which you can see from the picture below:

However, what interest me was it’s simplicity now to flash the chip, the USB connectivity and bread board friendly layout, very much like the Particle chips. So I think, why not give it a try, besides, it only costs €5.5 and comparing to the US$19 or €17 Particle-Photon, the NodeMCU dev board is less than 1/3 of the cost!
So I ordered 5pcs and the order arrived less than 20hrs later (very efficient delivery in China).
The first thing to do is to connect to the USB cable and plug into my MacBook Pro. One thing to note here is that you must have the USB-Serial driver installed beforehand. If you haven’t, it is time you download it from SiLabs – the installer I’ve got is called SiLabsUSBDriverDisk.dmg but of course, SiLabs reserved the rights to change the name to whatever they like in the future.
With the serial drive in place, you shall be able to find a new tty device under the /dev (you have to launch the Terminal.app and type
ls /dev/tty.*
and you should see one of them is:
/dev/tty.SLAB_USBtoUART
This is your serial port talking to the ESP8266 on the NodeMCU dev board.
For me, the driver was already there so I just fired up the serial console (I use minicom but you are free to choose), remember to set the communication parameters to 9600,8N1 and Software flow control. Do NOT use hardware flow control because the board does not support RTS/DTS flow control and there is no documentation telling you about this. If you now press the reset button on the NodeMCU dev board, you shall be able to see the welcome message, the version of Lua installed, plus the ‘>’ prompt.
At this point, you might prefer to first update the firmware to the latest one before you go on with the rest.
To update the firmware using a Mac, you will need the tool called esptool.py (downloadable from here, this tool is maintained by themadinventor). You can download the latest firmware binary here form the official NodeMCU git. The firmware shall end with the extension .bin, if it ends with .zip or .gz, unpack it to get the .bin
To burn the firmware to the ESP8266, plug the USB cable to the NodeMCU dev board and the other end to your Mac, take a note at the serial port reported (see above), press once the Flash button (the button above the micro-USB socket on the above picture showing the Photon comparison) and execute the following in the Terminal.app:
python ./esptool.py --port=/dev/cu.SLAB_USBtoUART write_flash -fm=dio -fs=32m 0x00000 some_version_of_NodeMCU_firmware.bin
You may have a different serial port than mine, if so, replace /dev/cu.SLAB_USBtoUART to whatever you’ve got.
Once the firmware is flashed successfully to the device, you may start trying out the Lua language at the interactive ‘>’ prompt. For the simple Hello World:
> print("hello,world!")
hello,world
For variable assignment:
> str = "Hello world!"
> print(str)
Hello world!
Feel free to play around.
Cont…